


Guides
1. Unbox Your Honbike HF01
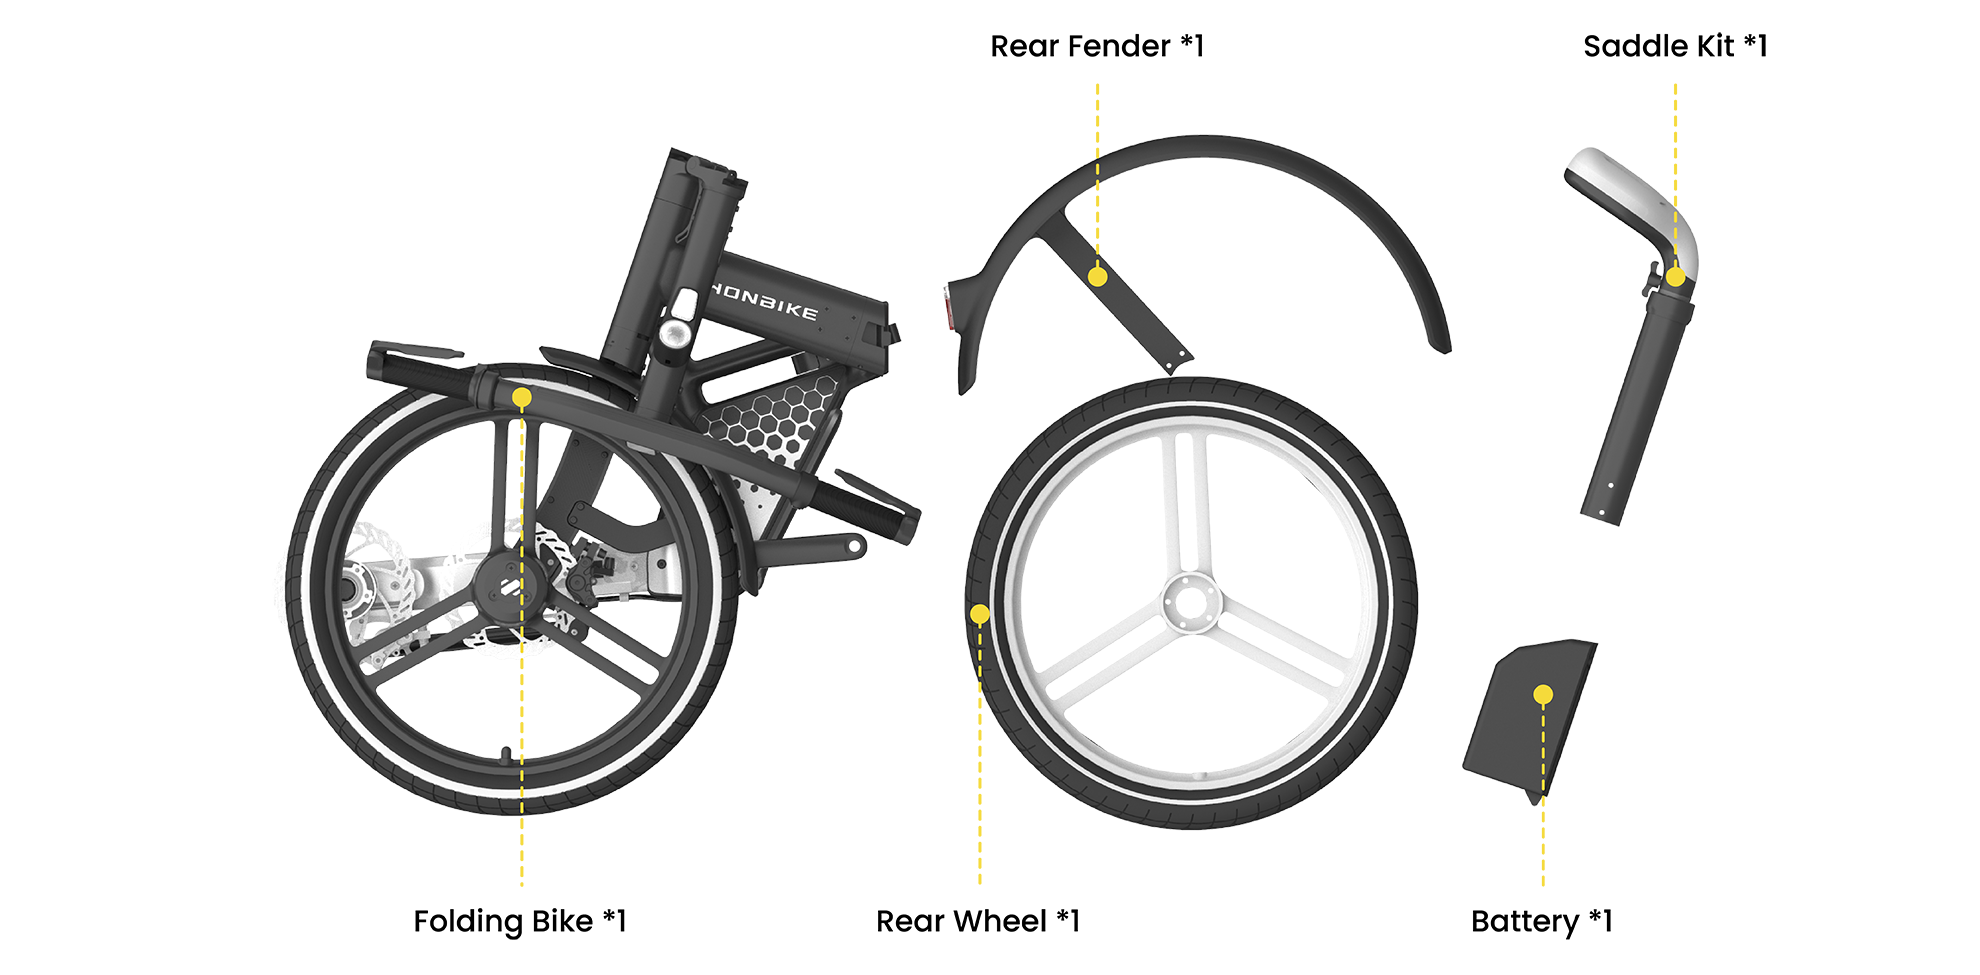
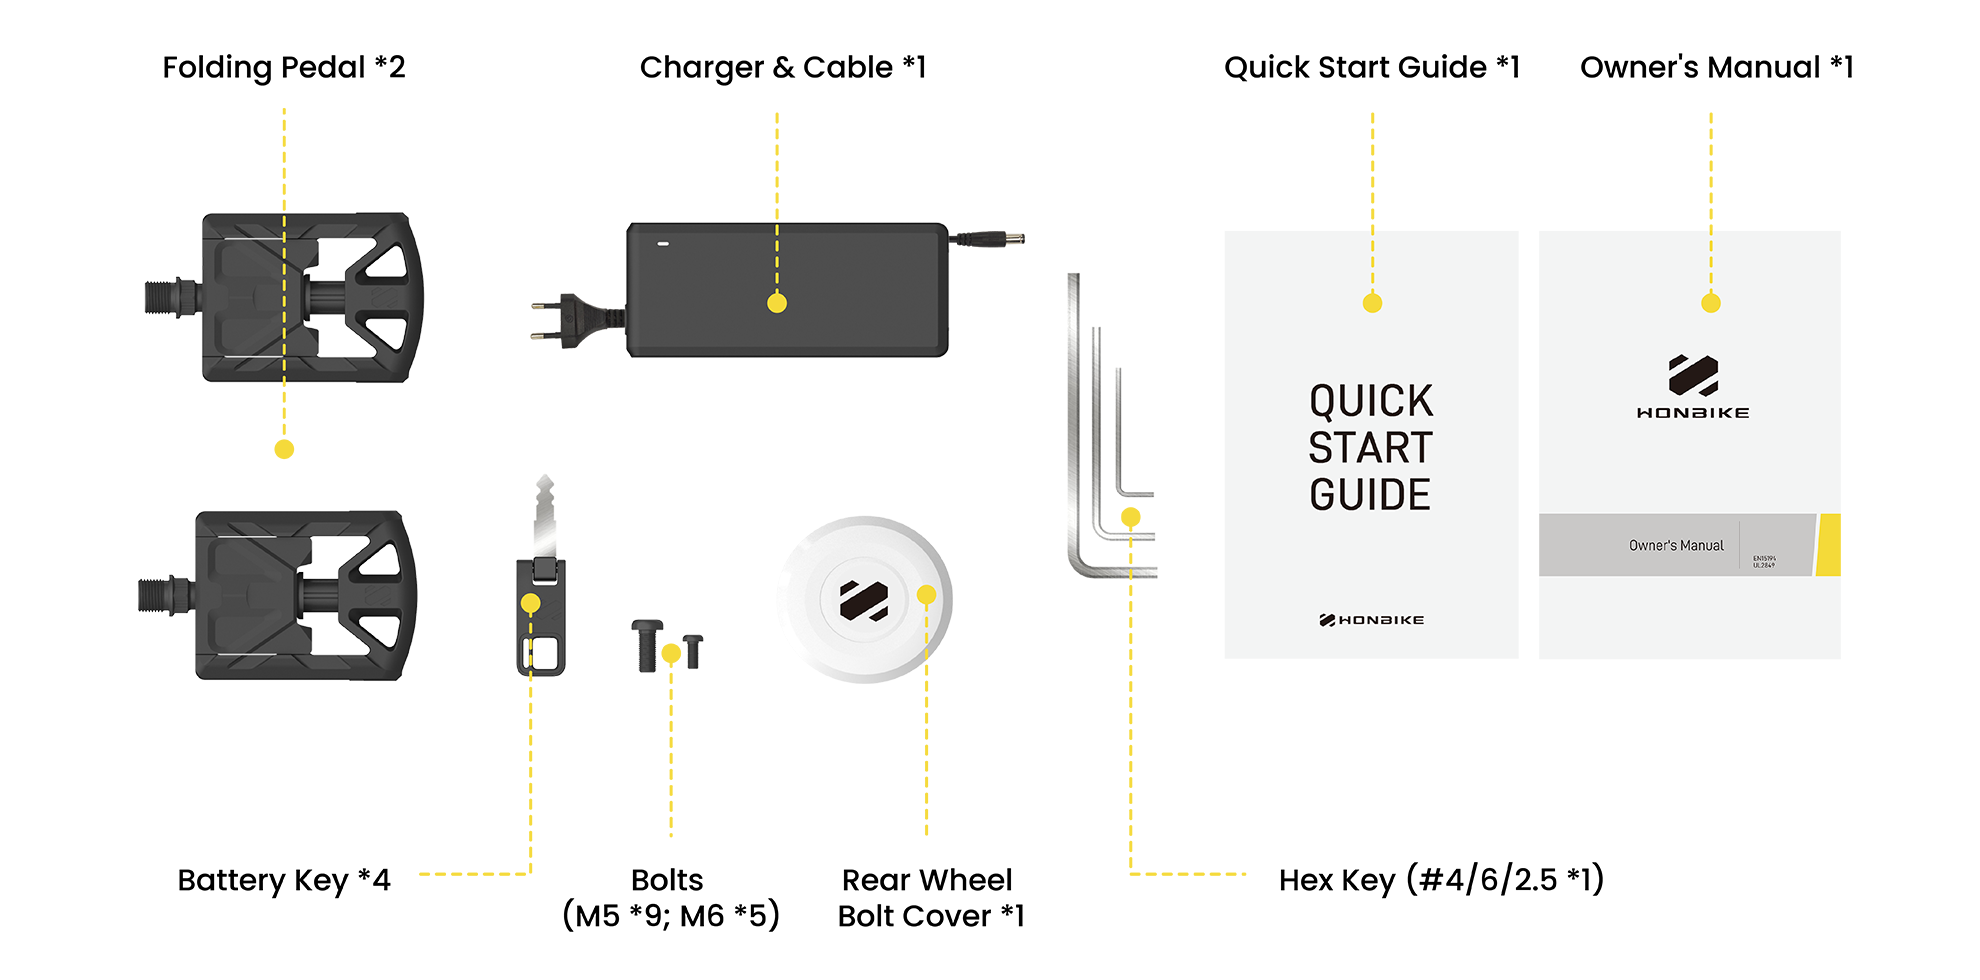
1. What's in the HF01 box
2. How to assemble your HF01
- Unboxing & Assembly:
- Step 1: Unboxing
- 1. Open the carton carefully and try not to damage it.
- 2. Take out the accessory box, battery and saddle kit separately and put them aside for later use.
- 3. Take out the upper foam to assit bike assembly.
- 4. Take out the rear fender.
- 5. Lift the bike with one hand while taking the rear wheel out with the other hand, be careful to avoid scratching the paint.
- 6. Take the bicycle out of the carton, unfold the bicycle frame clockwise.
- 7. Use your palm to push the frame hinge into the bicycle frame until hearing a “click”.
- *Keep fingers out of the frame hinge.
- 8. Lay the bike on the foam.
- Step 2: Mount the Rear Wheel & Rear Fender
- 1.Place the unpainted side of the center of the rear wheel onto the bicycle.
- 2. Loosely tighten the five M6 bolts to the rear wheel using Hex key #4, then firmly tighten each bolt alternating in a diagonal order until all bolts are firmly tightened.
- * Failure to tighten the bolts in diagonal order can lead to an untrue wheel. 13-15Nm
- 3.Snap on the rear wheel bolt cover.
- 4. Install the bolt on the front side of the rear fender to the drive shaft.(Hex key #4、M5*1、4-6Nm)
- 5. Run the rear light cable through the cable guide by moving the brake cable aside and threading it through.
- * You can also use the Hex key #2.5 to unscrew the bolt on the cable guide first and then run the rear light cable through.
- 6. Align the rear light cable arrows and connect the ends together, tuck the cable into the bottom of the battery case as far as possible.
- 7. Stand the whole bicycle up and lower the kickstand.
- 8. Install the two bolts of the rear fender stay using Hex key 4.(Hex key #4、M5*2、4-6Nm)
- 9. Remove the straps and the foam packaging on the stem, crank and frame.
- Step 3: Lifting the Stem
- 1. Flip the stem upward to the vertical position while paying attention to the brake cables.
- 2. Pull the hinge clamp downward to the lowest point and continue to push the stem to the vertical position.
- 3. Lift the hinge clamp up and firmly press it until hearing a “click”.
- Step 4: Install Folding Pdeal
- Left Pedal:
- Take the left pedal with the label L.And then screw it on anticlockwise.Use Hex key #6 to tighten it anticlockwise.
- Right Pedal:
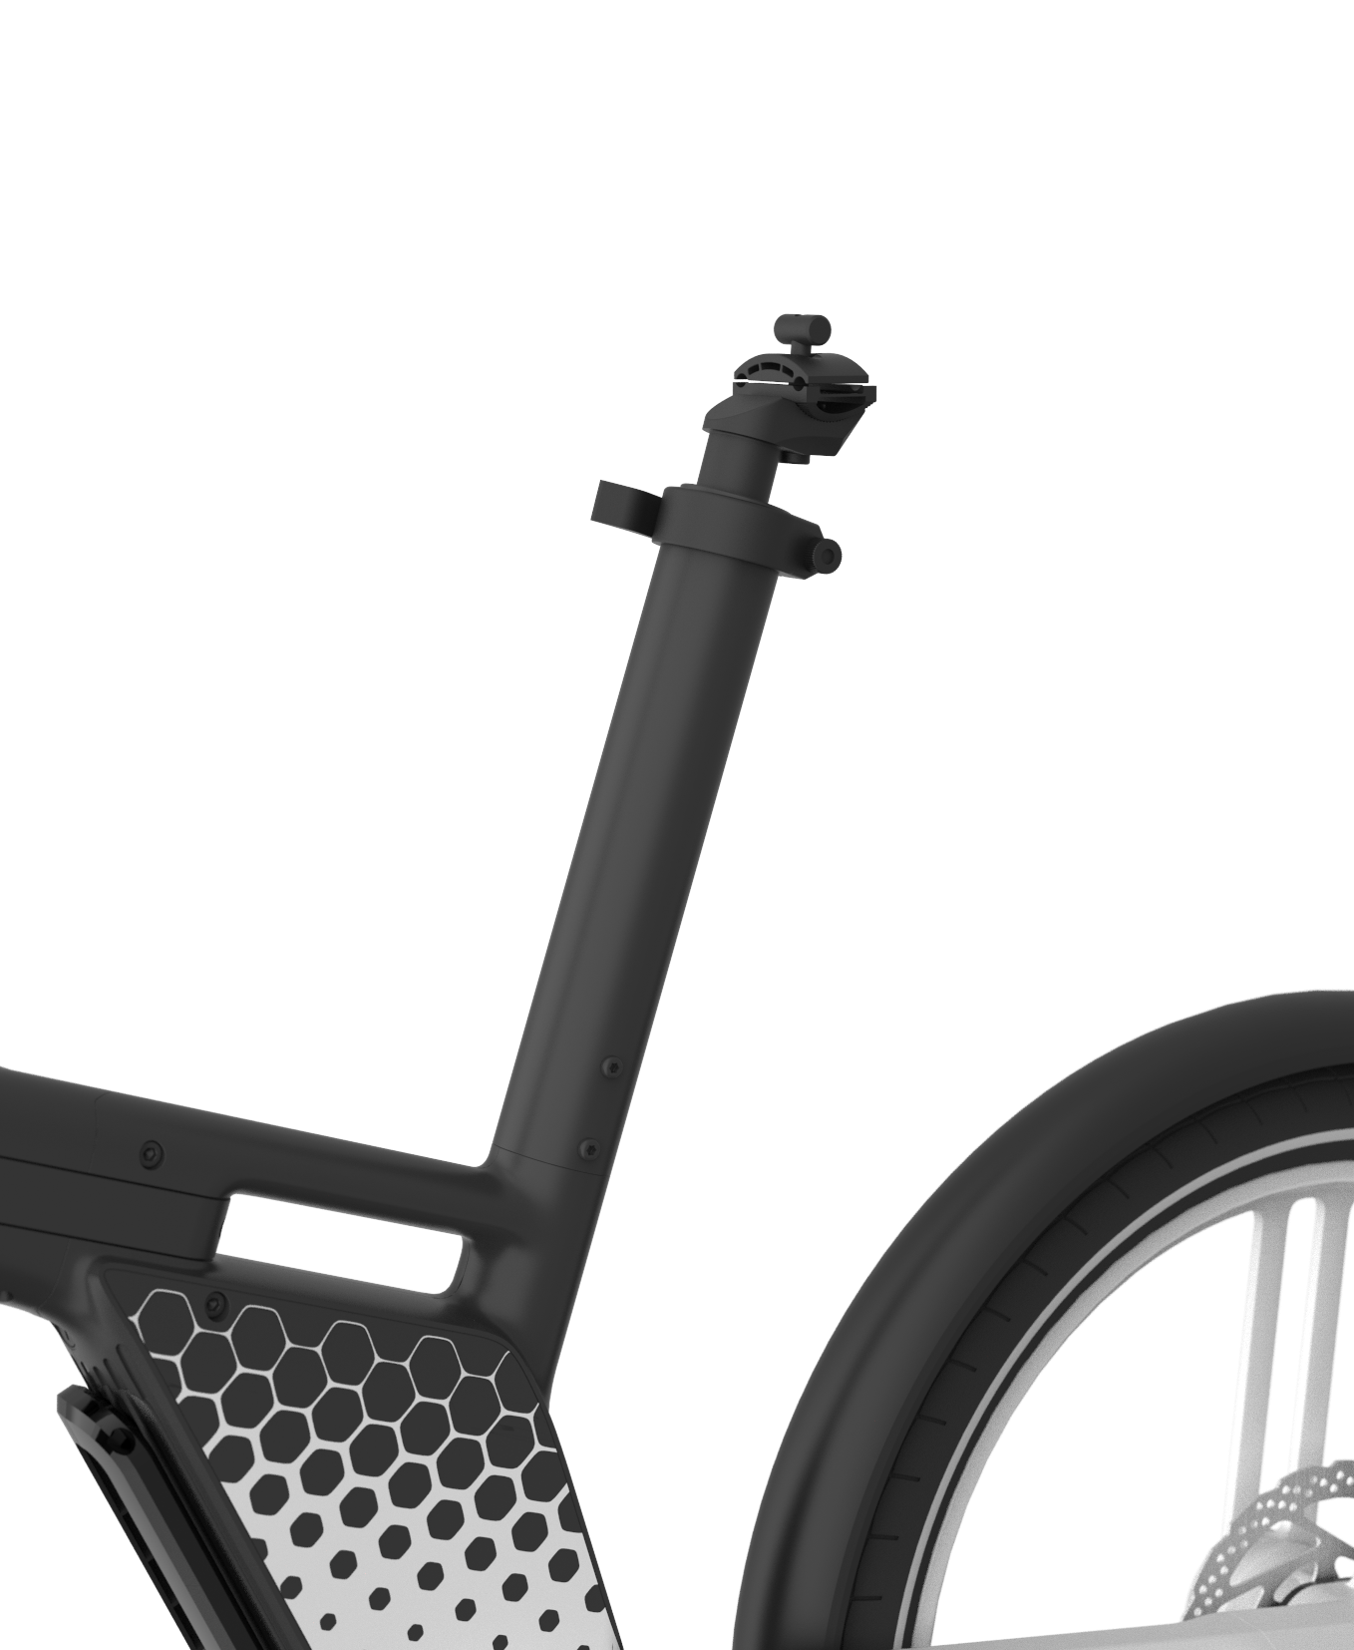
- Step 5: Assemble the Saddle Kit
- 1. Put the saddle & seat post kit onto the frame.
- 2. Align the four holes on the seat post with the four holes on the frame.
- *Install the lower bolts on both sides first, then install the upper bolts.
- 3. Tighten the four bolts clockwise using Hex key #4. (M5*4、6-8Nm)
- Step 6: Installing the Battery
- 1. Pull the folding stand release inside the folding stand up to the end, then push the folding stand down until it stops.
- *If you push the folding stand without pulling the folding stand release to the end first, the folding stand may break.
- 2. Insert the bulge of the battery into the battery compartment of the bicycle.
- 3. After the lower part of the battery is in place, push the battery toward the battery compartment until hearing a “click”.
- *Double check the battery is installed in place, otherwise the battery may fall out.
- 4. Pull the folding stand release inside the folding stand to the end, and gently lift the folding stand.
*Notice Please assemble the bicycle on a smooth indoor surface or carpet to avoid scratching it.
- Take the right pedal with the label R.Screw it clockwise onto the crank by hand.Use hex key #6 to tighten it clockwise.
3. How to fold your HF01
- 1. Stand on the left side of the bicycle. Lean the bike on the kickstand.
- 2. Pull the folding stand release inside the folding stand up to the end, then push the folding stand down until it stops.
- * If the folding stand does not reach the correct position, the bicycle may not stand securely after it is folded.
- 3. Rotate the pedal counterclockwise to between 2 and 5 o'clock;
- 4. Place both thumbs on the crank with all the other fingers on the end of the right pedal. Press the pedal toward the frame and then fold the pedal upward.
- 5. Press the button on the hinge clamp with your left thumb, and open the hinge clamp downward to the lowest point.
- 6. Fold the stem down and use your right hand to adjust the position of the brake cables to avoid interference when folding.
- 7. Push the safety lock to the far-left side and keep it still, then push the frame hinge toward your body.
- The bike may not be able to fold when the frame hinge is not fully opened.
- 8. Hold the head tube and the seat tube, lift the front wheel slightly and fold the frame clockwise.
4. How to unfold your HF01
- 1. Stand on the left side of the bicycle and unfold the bike counterclockwise.
- 2. Use your palm to push the frame hinge to the bicycle frame until hearing a “click”.
- 3. Push down the folded part of the pedal with your palm until hearing a “click".
- 4.Pull the folding stand release inside the folding stand to the end and gently lift the folding stand.
- 5. Flip the stem upward to the vertical position while paying attention to the brake cables.
- 6. Pull the hinge clamp downward to the lowest point and continue to push the stem to the vertical position.
- 7. Lift the hinge clamp up and firmly press it until hearing a “click”.
6. How to lock/unlock your Honbike via HONBIKE APP
7. How to register your Honbike via HONBIKE APP
2. Before Your First Ride
NOTE: Before riding the bicycle, please read the manual carefully to make sure you understand each section of the manual. Familiarize yourself with the bicycle and its controls before riding in traffic.
- Check if the stem hinge and frame hinge are fixed, and if the frame is unfolded correctly in place before riding.
- Check whether the folding stand can be lifted and lowered normally. Make sure you have lifted the folding stand before riding.
- Make sure that you are familiar with the functions of all buttons and the meanings of the display information by referring to the content in the relevant sections of the electrical system.
- Before you set off for the first time, check whether the battery is fully charged, properly mounted and that it is locked.
- Check if the front light and rear light can be turned on normally and if the front and back reflectors are not damaged.
- Check if the display works normally.
- Push the bicycle forward and backward, check whether the front and rear wheels can rotate smoothly and whether there is any noise from the drive shaft to ensure that there is no stalling or unsteadiness during riding.
- Check tire pressure. Press the tires with your thumbs, which shall be solid and firm. If the tire pressure is insufficient, inflate to an air pressure of at least 3.4 - 3.6 bar (50 Psi), but over-inflation should be avoided.
- Adjust the saddle to a proper height. Check that you can reach the floor with the tip of your toes when sitting on the saddle.
- Check if the seat post is locked tightly before riding to ensure that the saddle and seat tube are securely fastened.
- During the assembly at Honbike, the right brake lever is used to control the rear brake and the left brake lever is used to control the front brake. Check if the brake setting could match with your habit. Try to use the rear brake first when braking.
- Stand next to the bicycle, pull the left and right brake levers at the same time and push the bicycle forward, the brake discs should be able to prevent the wheels from moving.
- You need to try braking on a flat, non-slip surface to make sure you can get used to the braking effect of the HF01 before riding it in traffic on a public road.
- Check whether the pedals are tightened onto the cranks and whether they can be folded and unfolded normally. Make sure that the pedals are unfolded before riding.
1.Hinge and folding stand
2.Check if the seat tube bolts and rear fender bolts are tightened before riding.
3.Electrical system.
4.Transmission system
5.Tires
6.Saddle
7.Brake
NOTE: In the UK, China and Japan, the brake setting is different with the left brake lever for rear brake and the right brake lever for front brake.
8.Pedals
3. How to Register your Honbike HF01?
*Notice: Before use your HONBIKE, you need to register your Honbike via Honbike app. You will need a mobile phone, the owner’s manual and your eBike.
- Register Your eBike in 3 Setps
Step 1: Download HONBIKE APP


Step 2: Create your HONBIKE owner's account
- Open your HONBIKE APP.
- Choose 'Registration' button.
- Select your region and enter your email address to create HONBIKE owner's account.
- Once success, log in with your account for the e-bike registration steps.


Step 3: Register your Honbike
- Check the back of your owner's manual.
- Find the frame number and verification code section.
- Use your phone to scan the number & code to register your HONBIKE.
*Notice: Each eBike can only be registered by one email account at once. Please confirm that you are the owner of the e-bike.


4.General Questions of HF01
How to charge HF01?
The battery can be charged on or off the bicycle. Gently open the rubber cover and insert the charger plug into the charging port to charge the battery. Put the rubber cover on after the battery is fully charged. When the display shows that the battery capacity is low, it needs charging immediately. When the battery is fully charged, a green light on the charger indicates the charge is complete. A complete charge will take about 3.5-4 hours.
Close the charge port lid to seal it against water and debris.
NOTE: Make sure that your bicycle, battery and charger are dry without any moisture visible before charging. If the bicycle, battery and charger are wet, wipe them with a clean cloth and wait until they are completely dry before charging.
NOTE: Do not move the bicycle during the charging process, as this may tangle the wires and cause danger.
NOTE: Please use the Honbike HF01 charger to charge the battery. Do not charge the battery with chargers other than the charger provided by Honbike. Honbike shall not be held responsible for any accidents caused by using other chargers not approved by us.
Maximum permitted overall weight
HF01 can carry a maximum load of 100kg. Riding range and speed will be affected by the load carried by it, power assist settings, road conditions, tyre pressure and weather conditions.
NOTE: Exceeding the loading capacity will void all warranties and may result in unsafe operation of the product, which in turn may affect your life safety.
NOTE: Make sure you have good control of the e-bike carrying your luggage and keep it balanced. If you can't control it well, please reduce the weight of the luggage. Sudden shifts in load while riding can affect your balance and lead to serious injury or death. We recommend that you practice how to control the HF01 with luggage in a safe area before riding on public roads.
How to increase riding mileage?
Many conditions may affect the range of the bicycle, including load, riding speed, rider's pedal power, tire pressure and type, road conditions and weather conditions. Continuous use of motor assist and/or selecting the highest speed mode while riding will reduce the HONBIKE range.
To maximize the range of HONBIKE, you can try the following method:
- Try to pedal as much as possible.
- We recommend you to use the low assist gear or no-assist mode to ride the bicycle on flat roads or downhill roads, and select high power gear when riding against the wind, uphill and with heavier loads.
- Try to keep the load to a minimum level.
- Inflate the tires properly and keep the tire pressure within the normal range.
- In case of poor road conditions (e.g., bad pavement, potholes or speed bumps), reduce the speed and adjust the riding modes.
NOTE: Ambient temperatures below +10 °C/50 °F and above +40 °C/104 °F can reduce the range.
How to set the pedal assist level?

Level 0No motor assistance
Level 1 & 2Eco mode, low motor power assistance
Level 3 & 4Normal mode, medium motor power assistance
Level 5 Sport mode, high motor power assistance
Honbike is equipped with smart sensor to provide automatic power assistance when going uphill.
NOTE: When riding the bicycle for the first time, we advise you to start from power assist level 1. When you are familiar with the bicycle and have experience riding it, then try higher levels. Higher levels mean higher speeds, so please keep your mind focused when riding the bicycle.
NOTE: Do not step on the pedals before sitting in the saddle, select the lowest drive assistance and be ready to brake when you set off. Risk of falling!
Can I adjust the brake lever angle?
The angle of the brake levers of HF01 is set at the factory for optimum brake performance and comfort. Please do not attempt to adjust the angle of the levers as this may cause irreparable damage and may void your warranty.
Can I customize my bike?
- Many parts of HF01 are customized, which aren’t compatible with regular ebike parts. Please do not modify, refinish, disassemble, or replace the original components on your bike. Doing so will invalidate your warranty and could put you in danger.
- Do not modify your HF01 with firmware not compliant with your local regional laws and regulations.
- Modifications can cause damage and can increase the risk of failure and accidents which may result in serious injury or death and can render the product non-compliant which place you and others at risk.
- Refinishing can hide structural damage, such as fatigue cracks or structural problems which may also result in an accident.
5. How to Customize HF01 LCD Display?
Meet Honbike HF01 Display

Display Operation
Power on/off Press and hold the Power button until the display is on/off
Power assist Short press Plus button to increase the power assist level
Short press Minus button to decrease the power assist levelTrip distance The display shows single trip distance by default. Short press the Power button to check total distance.
Turn on/off the light Press and hold the Plus button until the lights are on/off
Walk mode Press and hold the Minus button
NOTE: The power will automatically shut off after 5 minutes if not being used.
NOTE: Only activate “walk mode”feature when pushing the bicycle.
Advanced Settings
- When the display is turned on, press and hold the Plus and Minus buttons at the same time to enter the advanced settings interface.
- Press and hold the Minus button for 2 seconds to quit the setup mode.
- After entering the setup mode, the interface will show P1 and the number 1 will blink.
- Press Plus or Minus buttons to switch between different parameter settings.
- P1 - Metric/English system switching;
- P4 - Adjust backlight brightness;
- P5 – Auto power-off timer;
- P6 – Single trip distance reset.
- *NOTE:
- In the advanced settings interface, if no operation is performed for more than 30 seconds, the system will automatically exit the setup mode and the current parameters will be automatically saved.
How-to-Set the Pedal Assist Level
Level 0 No motor assistance
Level 1 & 2 Eco mode, low motor power assistance
Level 3 & 4 Normal mode, medium motor power assistance
Level 5 Sport mode, high motor power assistance
Honbike is equipped with smart sensor to provide automatic power assistance when going uphill.


NOTE: When riding the bicycle for the first time, we advise you to start from power assist level 1. When you are familiar with the bicycle and have experience riding it, then try higher levels. Higher levels mean higher speeds, so please keep your mind focused when riding the bicycle.
NOTE: Do not step on the pedals before sitting in the saddle, select the lowest drive assistance and be ready to brake when you set off. Risk of falling!
How to reset the single trip distance?
-
When the interface shows P6, short press the Power button, then press the Plus button to switch between “y” and “n”. When the interface shows “y”, short press the Power button to reset the single trip distance. After completing the setting, short press the Power button to save the setting.

How to switch between mile and km?
-
When the interface displays P1, short press the Power button first, then press the Plus or Minus button to switch between mile and km. After the setting is completed, short press the Power button to save the setting.

How to adjust backlight brightness?
-
When the interface displays P4, short press the Power button first, then press the Plus or Minus button to set the backlight brightness. 1 stands for the lowest brightness, and 5 stands for the highest brightness. After selecting the value, short press the Power button to save the setting.

How to set an automatic display shutdown timer?
-
When the interface displays P5, short press the Power button first, then press the Plus or Minus button to adjust the automatic shutdown time in minutes. 0 means that automatic power off function will be disabled. After completing the setting, short press the Power button to save the setting.

6. How to Adjust Your Honbike HF01?
How-to-Adjust-Seat Height
- 1. Turn the seat post lock clockwise.
- 2. Lift the saddle upward to appropriate height.
- 3. Tighten the seat post lock counterclockwise until it is locked perpendicular to the ground.
- 4. When you see the “Minimum Insertion" warning mark, the saddle has been raised to its highest position.
How-to-Fold/Unfold the Pedals
- How to fold the pedal
- 1. Place both thumbs on the crank with all other fingers on the end of the pedal.
- 2. Press the pedal toward the frame and then fold the pedal upward.
- How to unfold the pedal
- 1. Push down on the folded part of the pedal with your palm until hearing a “click", indicating that the pedal has been unfolded in place.
How-to-Install/Remove Battery
- Installing the battery
- 1. Pull the folding stand release inside the folding stand up to the end, then push the folding stand down until it stops.
- *If you push the folding stand without pulling the folding stand release to the end first, the folding stand may break.
- 2. Insert the bulge of the battery into the battery compartment of the bicycle.
- 3. After the lower part of the battery is in place, push the battery toward the battery compartment until hearing a “click”.
- * Double check the battery is installed in place, otherwise the battery may fall out.
- 4. Pull the folding stand release inside the folding stand to the end, and gently lift the folding stand.
- Removing the battery
- 1. Pull the folding stand release inside the folding stand up to the end, then push the folding stand down until it stops.
- 2. Insert the key.
- 3. Hold the battery to prevent it from falling to the ground. Turn the key counterclockwise to open the battery lock.
- 4. Remove the battery and pull out the key.
- 5. Pull the folding stand release inside the folding stand to the end, and gently lift the folding stand.
- *If your battery hits the ground and is damaged, please stop using it and contact us promptly.
How-to-Use the Folding Stand?
- Lower the folding stand
- Pull the folding stand release inside the folding stand up to the end, then push the folding stand down until it stops.
- If you push the folding stand down without pulling the folding stand release to the end, the folding stand may break.
- Lift the folding stand
- Pull the folding stand release inside the folding stand to the end, and gently lift the folding stand.
7. How to Install HF01 Accessories?
Saddle
Can I change the saddle?
Honbike HF01 saddle and seat tube are a fixed kit, and you can't remove the saddle separately. If you prefer a more traditional saddle, we have designed a saddle replacement kit, you can purchase it at our webstore.
You can refer to for the procedure of saddle replacement.
How to change HF01 saddle?
HONBIKE has designed a saddle replacement kit for people who prefer a more traditional saddle.
Steps for saddle replacement:
- 1. Unscrew the four bolts holding the saddle kit counter-clockwise using hex key #4. Remove the saddle kit from the frame.
- 2. Unlatch the seat post clamp, and lift the seat tube upward to an appropriate height to easily loosen the saddle bolt to lift up the top plate. Then close the seat post clamp.
- 3. Unscrew the saddle bolt counterclockwise using hex key #6.
- 4. Slide the saddle rails of your new saddle into the channel of the plates. Position the plates so that they hug the saddle rails. Once you’re happy with the positioning, tighten the bolt (18-22Nm).
- 5. Attach the new saddle kit to the frame. Align the four bolt holes on the seat tube with the four holes on the frame. Tighten the four bolts clockwise (4-8Nm).
- 6. To adjust your seat up or down, unlatch the seat post clamp. Move the seat to the desired height and close the seat post clamp.

Battery Case
How to install HF01 battery case?
This battery case is specifically designed for HF01 battery. You can place one battery inside the case and attach the battery case to the bike.
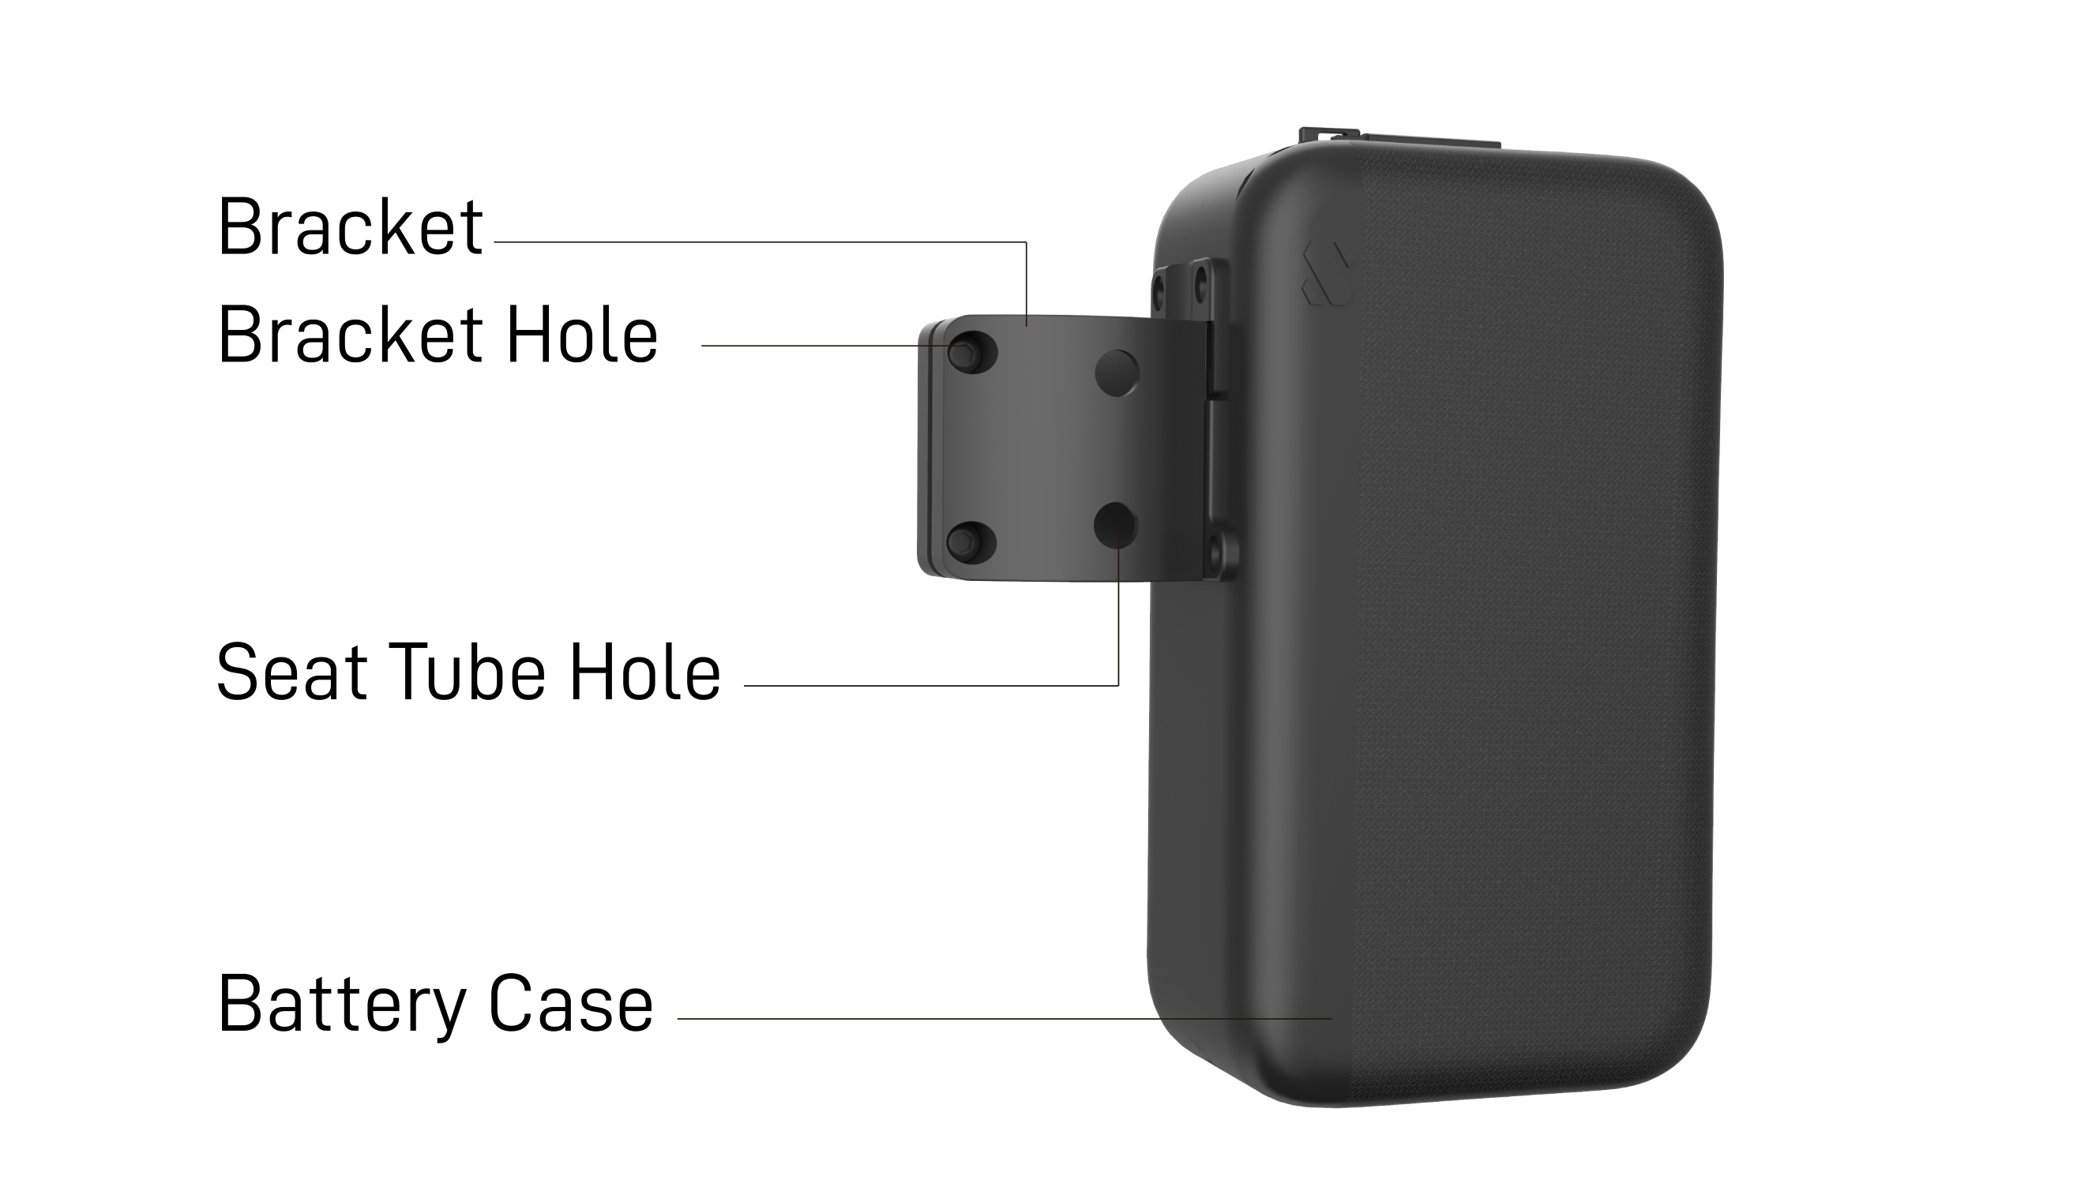
Steps for attaching the battery case:
- 1. Unscrew the four bolts holding the saddle kit counter-clockwise using hex key #4. Put the bolts aside for later use. Remove the saddle kit from the frame.
- 2. Put the battery case bracket on the seat tube, then put the seat tube back on the frame.
- 3. Align the seat tube holes on the bracket with the holes on the seat tube.
- 4. Use hex key #4 to tighten the four M5*12 seat tube bolts clockwise with a torque of 4.5Nm.
- 5. Use hex key #4 to tighten the two M5*16 bracket bolts clockwise with a torque of 4Nm.
- 6. Align the battery case with the slots on the bracket and slide it down to install the battery case on the frame. Grab the battery case and lift it upward to remove it from the frame.


Can I install accessories such as a rear rack, child seat, and smart phone holder?
HF01 has a load capacity of 100kg, including luggage. It is not designed to carry people or cargo, please do not modify and install a rear rack or child seats, as this may exceed HF01 load capacity and cause danger.
HF01 does not provide smart phone holder at the moment. If you want to install a smart phone holder, you need to pay attention to the unique handlebar design of HF01, and check if the holder matches the handlebar.
8. How to Pack Your Honbike HF01
Preparations
- Bike carton & Upper + Lower foam
- Accessory box & Battery box
- Charger & cable, Owner's Manual, Quick Start Guide
- Packing materials: (PE bag, foam tubing, cable ties, plastic bag, packing tape, frame strap)
- Disassembly tools:
- Hex key #4*1, Hex key #6*1, Hex key #2.5*1 (provided with the bike)
- Small flat-head screwdriver *1

1. Remove the Folding pedals
- Step 1: Remove both of your pedals using hex key #6. Your right pedal has a regular thread (turn counter-clockwise to loosen), while your left pedal is reverse threaded (turn clockwise to loosen).
- Step 2: Wrap the left crank with foam tubing, and secure foam tubing with cable ties.


2. Remove the Saddle kit
- Step 1: Adjust the saddle height to the lowest position, and tighten the seat post lock counter-clockwise.
- Step 2: Unscrew the four bolts counter-clockwise using hex key #4.
- Step 3: Remove the saddle kit from the bike and wrap it in a PE bag.
- Step 4: Wrap or cover the frame saddle tube on the frame with foam tubing.


3. Fold the Stem
Fold the stem down. Wrap the stem with foam tubing, and secure foam tubing with cable ties. Tie the stem to the head tube with frame strap.


4. Remove the battery
- Hold the battery with your hand when unlocking the battery. Turn the key counter-clockwise.
- Take out the battery and put it in the battery box.
- Remove the key.

5. Remove the Rear wheel & fender
- Step 1: Rotate the rear wheel bolt cover to find the opening slot, insert a small flat screwdriver into the gap. While holding the rear wheel bolt cover with the other hand, gently push the screwdriver outward and remove the rear wheel bolt cover.
- Step 2: Unscrew the 5 bolts of the rear wheel using hex key #4 to remove the rear wheel.
- Step 3: Disconnect the rear light cable connector and remove the cable on the rear fender side from the cable guide.
- Step 4: Unscrew the 3 bolts of the rear fender using hex key #4 to remove the rear fender.


6. Accessory box
Put the following items into the accessory box:
- Charger & cable x1
- Battery key x 4
- Rear wheel bolt cover x1
- Pedals x 2
- Bolts: M5 (9pcs), M6 (5pcs)
Tools:
- Hex key #4 x1
- Hex key #6 x1
- Hex key#2.5 x1
- Owner's Manual x 1
- Quick start guide x 1

7. Secure your bike in the box
- Step 1:Place the lower foam base into the bike carton.
- Step 2: Lift up the kickstand and folding stand, and fold the bike as usual.
- Step 3: Place the bike, rear wheel and rear fender into the bike carton. Make sure to align the bike and components with the reserved positions in the foam base.
- Step 4: Cover the folded bike with the protective PE bag. Put the upper foam cover into the bike carton, and make sure to align the cover with the bike.
- Step 5: Place the Saddle kit, Accessory box and Battery box into the upper foam cover. Seal the bike carton and wrap it with packing tape.


9.Servicing & Maintenance of HF01
How often should I get my bike serviced?
The user shall be responsible for safe riding and regular maintenance. Your bicycle needs a regular service. Below is our recommended service frequency based on how often you ride.
Monthly (or every 500kms/ 300 miles )
- Check tire pressure. Press the tires with your thumbs, which shall be solid and firm. If the tire pressure is insufficient, inflate to an air pressure of 3.4-3.6 bar, avoid over inflating your tyres.
- Clean and lubricate moving parts regularly.
- Check that all hardware is tightened to the torque specifications listed in the Recommended Torque Values section of HF01 owner’s manual.
- Check your brake pads for signs of wear. Replace if necessary.
- Check the frame, front fork and kickstand for any damage, deformation or cracks.
- Check all wiring harnesses (such as brake wires, front light wires and rear light wires) of the whole bicycle for any damage or wear.
- Check the charger and its wiring harness for damage and check if the bicycle can be charged normally.
Quarterly (or every 1500kms/ 900miles)
- Check all items on the monthly service list above.
- Check tire tread for excessive wear. Replace if necessary.
- Check and update to the latest firmware version.
NOTE: This maintenance interval is based on normal usage. If you ride your HF01 more than average, or in rain, snow, or bad road conditions, maintain your bicycle more often than the suggested interval.
How to maintain your HF01?
Compared with conventional ebikes, HF01 is low maintenance with fewer complicated parts that require less attention for simplicity. After riding for a period of time, like any bicycle, some parts may loosen, wear or become damaged, so inspection and maintenance at regular intervals will extend the service life of your HF01 and prevent damage and potential accidents.
Store your HF01 in a clean, dry place to avoid rust and corrosion.
The maintenance of HF01 is generally divided into the following tasks:
- Cleaning: Wipe the whole bicycle and parts with a damp rag and a low residual cleaner. Dry your HF01 thoroughly after cleaning to prevent corrosion and rust.
Remove any oil residue on the brake discs.
- Inspection: Brakes, tires and lights should be inspected regularly. Please refer to the sections “Before the First Ride” and “Before Every Ride” on your HF01 owner’s manual.
- Tightening: The fasteners of the whole bicycle should be tightened periodically by referring to the section of Recommended Torque Values on your HF01 owner’s manual.
- Lubricate: Clean and lubricate the following moving parts regularly.
- Adjustment: Brakes should be adjusted periodically. Ensure front and rear brakes work properly. Check brake cable tension, replace brake cables if necessary.
- Replacement: If a part is damaged or unusable or has any cracks, scratches or color changes, the part has reached the end of its service life and should be replaced promptly.

Battery care
Battery care
- To get the maximum life from your battery, you should use, store and recharge it correctly.
- Before you stop using the bicycle or removing the battery from the frame, cut off the power supply of the bicycle first.
- To prevent over-discharging, when the battery is not used for a long time, please charge it for 30 minutes or to 75% every three months. Over-discharging will lead to permanent damage to the battery.
- Riding in cold weather will reduce the range of the battery by up to 50%.
How to store your battery
The battery shall be stored in a half state at a temperature of 15~25℃ and relative humidity of no more than 75%. The battery shall be protected from impacts, rain, water immersion, heat sources, destruction of appearance, and a short circuit of terminals.
Charing tips
- Disconnect the battery after it is fully charged, and do not charge it for more than 5 hours each time.
- The battery shall be charged at 10℃~25℃. If you have been using the bike in cold weather, please leave the battery inside at room temperature for one hour before charging it.
- Please place the charger on a solid surface for charging and do not cover it during charging. Do not place it on a carpet or textile surface or block its vents, as the charger may heat up during charging (up to 40-50℃).
Low Power Mode
To extend the battery life, HF01 is pre-set with a “Low Power Mode,” which means you will receive less assistance from the motor when the battery capacity drops below 20%.
We recommend that you keep the battery power in the range of 30-70% to maximize your battery life and performance.
What is the battery life of HF01?
HF01 battery can last for 500 charging cycles. After 500 charging cycles, the battery still has about 80% of its original capacity.
Where can I find HF01 frame number?
The frame number of HF01 can be found on the bottom of the head tube. It consists of 15 digits. You can also find it on the back of your owner’s manual.
How to register your HF01?
Before use your HF01, you need to register it via HONBIKE app.
You will need a mobile phone, the owner’s manual that comes with your HF01.
Steps:
- Download the HONBIKE app
- Create your HONBIKE account
- Register your HF01.
- Connect your HF01 to HONBIKE app
You can scan the QR code on the second page of the owner’s manual or go to Apple store or Google play store to download the app.
Select your region and then create your HONBIKE account with your email address. Once you have successfully created your account, log in with your account.
Scan the frame number and validation code on the back of your owner's manual to register your HF01.
Note: Please confirm that you are the onwer of the bike. Only one account can be registered as the owner.
Press and hold the Power button on your HF01 until the display is on.
Your HF01 will be connected to the app automatically. It usually takes 3 to 8 seconds, depending on the connectivity.
When the Bluetooth and the Lock icon on your app light up, you have successfully connected your HF01 to the app.
Note: Please make sure you have turned on the Bluetooth on your phone.
I can’t connect my HF01 to the HONBIKE app
HF01 connects to the HONBIKE app via Bluetooth. If you can’t connect your HF01 with the HONBIKE app, you can go through the following steps below to solve the problem,
- 1. Please make sure you select the same region as your registered account when you log in.
- 2. Please make sure the account you log in to is the same as the account you used to register your HF01.
- 3. Ensure the Bluetooth of your phone is turned on, and your phone is within 10 meters distance of your HF01.
- 4. If your bike still can’t be connected to the app, please restart your HF01 and the app.